githubログインを実装してみました。今回の目的はgithubログインを実装することで、deviseをかっこ良く使うなどは後回しにしています。
ログインに関しては、やり方の説明された日本語のブログ記事を参考にしつつ、主にplataformatec/deviseとlaserlemon/figaroのREADMEを参考にしました。なんて丁寧にわかりやすく書いてあるんだという感じです。
deviseの基本設定
流れとしては、下記のとおりです。
gem ‘devise’ gem ‘omniauth-github’ gem “figaro”
Gem fileに上記設定を追加して、bundle installしておきます。それから、下記のコマンドを実行していきます。コマンドの説明に関しては、deviseのREADMEを参考にしました。
$ rails g devise:install $ rails g devise User $ rake db:migrate
という感じです。Userを使うのが一般的みたいです。
deviseが下記のヘルパーを作ってくれました。これ、よく見る。deviseが作ってくれていたんですね!
ログインしていなければログインページに飛ばしてくれます。
before_action :authenticate_user!
ログインしているか確認できます。
user_signed_in?
ログイン中のユーザーを取得してくれます。
current_user
ログイン中のユーザーのセッションを取得してくれます。
user_session
ログインが必要なページにbefore_action : authenticate_user!を書いておくと、ログインページに飛ばしてくれます。routes.rbにルートを指定しておくと、ログイン後そこに飛ばしてくれます。
rake routesを実行して作成されたパスを調べて、ログアウトボタンも仮に付けておきました。サインアップして、ログアウトして、ログインするという流れが確認できました。
= button_to “Sign out”, destroy_user_session_path, :method => :delete
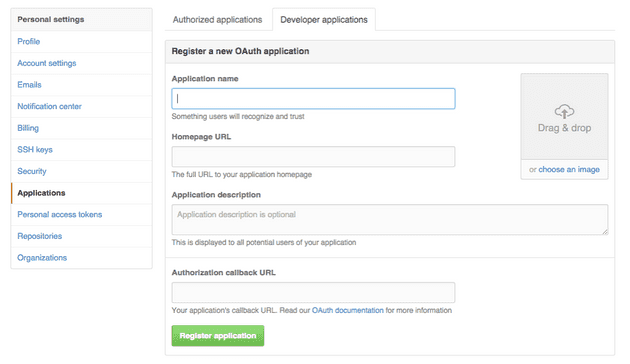
githubでアプリケーションの追加
アプリケーションを追加します。今回は開発環境で使うことを想定しているので、URLをhttp://localhost:3000にしました。
ここで、Client IDとClient Secretが発行されます。

GithubのIDとSecretを安全に扱う
今回はfigaroというgemを使って、公開したくない情報を管理することにしました。figaroはgithubにアップロードしない設定ファイルを作ってくれて、値はENV['']で取り出すことができます。似たような機能を提供するgemとしてdotenvがありますが、違いはこちらで説明されています。
gem “figaro”
とGemfileに追記した後に、bundle installしておきます。そして、
$ figaro install
とすれば、config/application.ymlができます。このファイルは同時に.gitignoreにも追記されるのでgithubにはプッシュされません。
GITHUB_ID: ********************* GITHUB_SECRET: ****************************************
このように記述します。
Githubログインの実装
ここからは、OmniAuth: Overview · plataformatec/devise Wikiを参考にして進めていきます。
providerとuidをUserに追記します。
$ rails g migration AddColumnsToUsers provider uid $ rake db:migrate
続いて、devise.rbに設定を追記していきます。
config.omniauth :github, ENV[“GITHUB_ID”], ENV[“GITHUB_SECRET”], scope: ‘user,public_repo’
このように書きました。この辺りは、OmniAuthを参考にしています。
Userモデルに下記の行を追記します。
devise :omniauthable, :omniauth_providers => [:github]
今回はひとつのモデルだけで行いましたが、複数モデルで対応したい場合は、OmniAuth with multiple models · plataformatec/devise Wikiを参考にすると良いということ。
更に、viewに下記のリンクを追記します。
= button_to “Sign in with Github”, user_omniauth_authorize_path(:github)
routes.rbに下記の行を追記します。Github認証が終わった後にこちら側で処理を行うためのコントローラです。
devise_for :users, :controllers => { :omniauth_callbacks => “users/omniauth_callbacks” }
app/controllers/users/omniauth_callbacks_controller.rbという名前でコントローラを追加します。
class Users::OmniauthCallbacksController < Devise::OmniauthCallbacksController def github # You need to implement the method below in your model (e.g. app/models/user.rb) @user = User.from_omniauth(request.env[“omniauth.auth”])
if @user.persisted?
  sign\_in\_and\_redirect @user, :event => :authentication #this will throw if @user is not activated
  set\_flash\_message(:notice, :success, :kind => "Github") if is\_navigational\_format?
else
  session\["devise.github\_data"\] = request.env\["omniauth.auth"\]
  redirect\_to new\_user\_registration\_url
end
end end
モデルに下記メソッドを追記します。SignInの時にユーザを作成するメソッドです。これは例です。必要な情報をUserモデルに格納します。
def self.from_omniauth(auth) where(provider: auth.provider, uid: auth.uid).first_or_create do |user| user.email = auth.info.email user.password = Devise.friendly_token[0,20] user.name = auth.info.name # assuming the user model has a name user.image = auth.info.image # assuming the user model has an image end end
SignIn以外でもUserが作成された時に情報を取得するために下記のメソッドもUserに追記します。これもemailだけを取得する例です。(この辺り英文の理解が曖昧なので間違った説明になっているかもしれません)
class User < ActiveRecord::Base def self.new_with_session(params, session) super.tap do |user| if data = session[“devise.facebook_data”] && session[“devise.facebook_data”][“extra”][“raw_info”] user.email = data[“email”] if user.email.blank? end end end end
とりあえず、ここまでにしておきます。ログインページなど変更したいな。deviseのREADMEに書いてあったので今度やろう。
